from __future__ import annotations
from pprint import pformat
from typing import List, Set, Tuple

ROWS = COLS = 9
NUMBERS = [x for x in range(1, 9 + 1)]

class Grid:
    """数独のクイズを表すグリッド"""
    _values: List[List[int]]
    def __init__(self, values: List[List[int]]):
        assert isinstance(values, list)
        assert len(values) == ROWS
        for row in values:
            assert isinstance(row, list)
            assert len(row) == COLS

        self._values = values

    def __hash__(self):
        """hashable 化するための __hash__ 定義
        - set() で利用するため
        """
        return hash(''.join(str(x) for row in self._values for x in row))

    def __str__(self):
        """`print()` で出力されたときの表現を定義する"""
        return '{}(\n{}\n)'.format(type(self).__name__, pformat(self._values))

    def solved(self) -> bool:
        """空セルがなくなったかどうかを判定する"""
        all_values = [x for row in self._values for x in row]
        return 0 not in all_values

    def possible_numbers(self) -> List[Tuple[int, int, List[int]]]:
        """すべての空セルと入りうる数字の組み合わせを全件洗い出す"""
        return [
            (row, col, self._possible_numbers_for_cell(row, col))
            for row, values in enumerate(self._values)
            for col, x in enumerate(values)
            if x == 0
        ]

    def clone_filled(self, row, col, number) -> Grid:
        """特定のセルに指定された値が入った新しい grid を返す"""
        values = [[x for x in row] for row in self._values]
        values[row][col] = number
        return type(self)(values)

    def _possible_numbers_for_cell(self, row, col) -> List[int]:
        row_numbers = [x for x in self._values[row]]
        col_numbers = [row[col] for row in self._values]
        block_numbers = self._block_numbers(row, col)

        return [
            x
            for x in NUMBERS
            if (x not in row_numbers)
            and (x not in col_numbers)
            and (x not in block_numbers)
        ]

    def _block_numbers(self, row, col) -> List[int]:
        row_start = (row // 3) * 3
        col_start = (col // 3) * 3
        return [
            x
            for row in self._values[row_start : row_start + 3]
            for x in row[col_start : col_start + 3]
        ]

def solve_all(grid: Grid) -> Set[Grid]:
    """指定された数独に対する解を全件返す"""
    solutions = set()

    def _solve(grid: Grid):
        # S4. 空のセルがなくなったら正解として追加
        if grid.solved():
            solutions.add(grid)
            return

        # S1. すべてのセルに対して入りうる数字をリストアップする
        possible_numbers = grid.possible_numbers()

        # S2 + S3. 入りうち数字が最も少ないセルに仮に数字を入れて再帰
        row, col, numbers = min(possible_numbers, key=lambda x: len(x[-1]))

        # S5. 入りうる数字がひとつも無い空のセルがある場合はそのルートは間違いなので終了
        if not numbers:
            return

        for number in numbers:
            next_grid = grid.clone_filled(row, col, number)
            _solve(next_grid)

    _solve(grid)

    return solutions
import streamlit as st
import cv2
from PIL import Image # 画像処理ライブラリ
import numpy as np # データ分析用ライブラリ
#import os # os の情報を扱うライブラリ
import pytesseract # tesseract の python 用ライブラリ
import unicodedata
import pprint
from typing import List, Set, Tuple
import solver
ROWS = COLS = 9
NUMBERS = [x for x in range(1, 9 + 1)]
def disp(ans):
m1="<span style=\"color: red; \">"
m2="</span>"
msg="### "
for x in range(9):
for y in range(9):
c=ans[x][y]
c=str(c)
if c != "0":
msg=msg+m1+c+m2
else:
msg=msg+c
msg=msg+'<br>'
msg=msg+'<br>'
st.markdown(msg,unsafe_allow_html=True)
def remove_control_characters(s):
return "".join(ch for ch in s if unicodedata.category(ch)[0]!="C")
def erase_lines(img,img_thresh,th1):
# OpenCVで直線の検出
# https://qiita.com/tifa2chan/items/d2b6c476d9f527785414
img2 = img.copy()
img3 = img.copy()
gray = cv2.cvtColor(img_thresh, cv2.COLOR_BGR2GRAY)
gray_list = np.array(gray)
gray2 = cv2.bitwise_not(gray)
gray2_list = np.array(gray2)
#lines = cv2.HoughLinesP(gray2, rho=1, theta=np.pi/360, threshold=th1, minLineLength=80, maxLineGap=5)
lines = cv2.HoughLinesP(gray2, rho=1, theta=np.pi/360, threshold=th1, minLineLength=150, maxLineGap=5)
xmin,ymin=500,500
xmax,ymax=0,0
if lines is not None:
for line in lines:
x1, y1, x2, y2 = line[0]
if x1<xmin:
xmin=x1
if y1<ymin:
ymin=y1
if x1>xmax:
xmax=x1
if y1>ymax:
ymax=y1
# 緑色の線を引く
red_lines_img = cv2.line(img2, (x1,y1), (x2,y2), (0,255,0), 3)
red_lines_np=np.array( red_lines_img)
#cv2.imwrite("calendar_mod3.png", red_lines_img)
# 線を消す(白で線を引く)
no_lines_img = cv2.line(img_thresh, (x1,y1), (x2,y2), (255,255,255), 3)
no_lines=np.array( no_lines_img)
dx=int(0.5+(xmax-xmin)/9)
dy=int(0.5+(ymax-ymin)/9)
sx=int(0.5+dx*0.05)
sy=int(0.5+dy*0.05)
st.write(xmin,ymin,xmax,ymax,dx,dy)
peaces=[]
for y in range(9):
for x in range(9):
p = xmin + x*dx + sx
q = ymin + y*dy + sy
cv2.rectangle(no_lines,(p,q),(p+dx-sx,q+dy-sy),(0,0,255),1)
peaces.append(cv2.cvtColor(no_lines_img[q:q+dy-sy,p:p+dx-sx],cv2.COLOR_BGR2RGB))
#st.image(peace,caption=str(x)+','+str(y))
im_h= cv2.hconcat([red_lines_img, no_lines])
else:
im_h = None
no_lines = img_thresh
return im_h, no_lines,peaces
def main():
st.title('文字認識の実験')
col1, col2 ,col3, col4 = st.columns([3,1,1,1])
KEI = None
with col1:
uploaded_file = st.file_uploader("画像ファイルを選択してアップロード")
if uploaded_file is not None:
img = Image.open(uploaded_file)
img = np.array(img)
th2 = st.slider(label='2値化の閾値',min_value=0, max_value=255, value=100)
th1 = st.slider(label='線消去の閾値',min_value=0, max_value=255, value=100)
with col2:
LNG = st.selectbox("言語選択",['eng','jpn'])
with col3:
KEI = st.checkbox('線削除')
with col4:
OCR = st.checkbox('OCR実行')
ret, img_thresh = cv2.threshold(img, th2, 255, cv2.THRESH_BINARY)
im_h = cv2.hconcat([img, img_thresh])
st.image(im_h, caption='元画像<--->2値化画像')
if KEI:
im_h, no_lines, peaces = erase_lines(img,img_thresh,th1)
if im_h is None:
st.warning('No line detectd')
else:
new_image = cv2.cvtColor(im_h, cv2.COLOR_BGR2RGB)
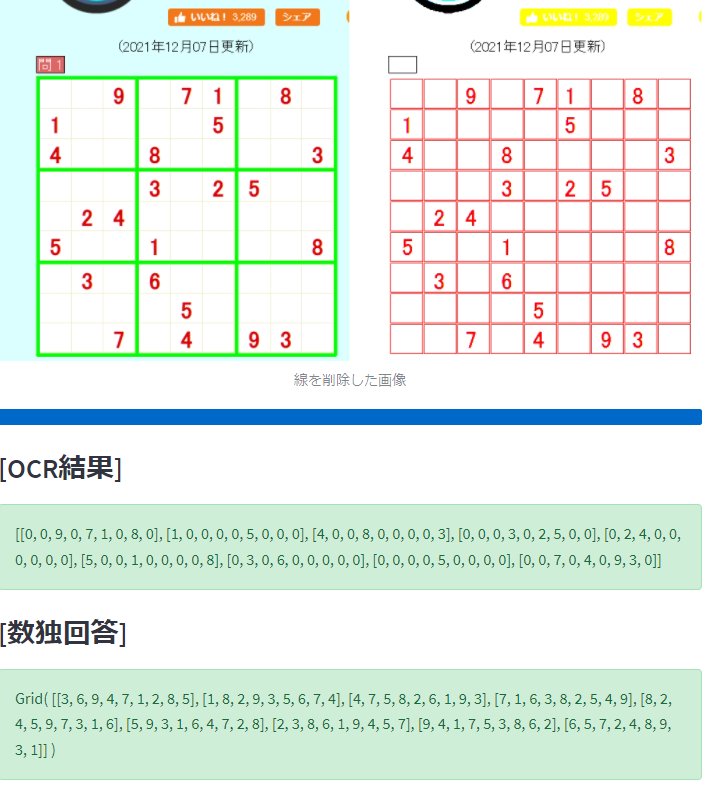
st.image(new_image,caption='線を削除した画像')
else:
no_lines=img_thresh
if OCR:
my_bar = st.progress(0)
st.subheader('[OCR結果]')
#txt = pytesseract.image_to_string(no_lines, lang="eng",config='--psm 11')
conf='-l ' + LNG + ' --psm 6 outputbase digits'
n=0
row=[]
for peace in peaces:
txt=pytesseract.image_to_string(peace, config=conf)
txt=remove_control_characters(txt)
if txt.isdigit():
ans=int(txt)
else:
ans=0
row.append(ans)
my_bar.progress(int(100*n/80))
n=n+1
row2=np.array(row).reshape(-1,9).tolist()
st.success(row2)
#st.write(row2)
grid = solver.Grid(row2)
results = solver.solve_all(grid)
st.subheader('[数独回答]')
m1="<span style=\"color: darkgray; \">"
m2="</span>"
msg="### "
for r in results:
buf=[]
for y in range(9):
for x in range(9):
buf.append(r._values[y][x])
c = r._values[y][x]
c = str(c)
d = row2[y][x]
if d != 0:
msg=msg + m1 + c + m2
else:
msg=msg + c
msg=msg + '<br>'
msg=msg + "<br>"
st.markdown(msg,unsafe_allow_html=True)
#
# b = np.array(buf)
# disp(b)
# c=b.reshape(-1,9)
# st.write(c)
if __name__ == '__main__':
main()