26日は久々の皆既日食。予行を兼ねて前日に撮影を試みました。
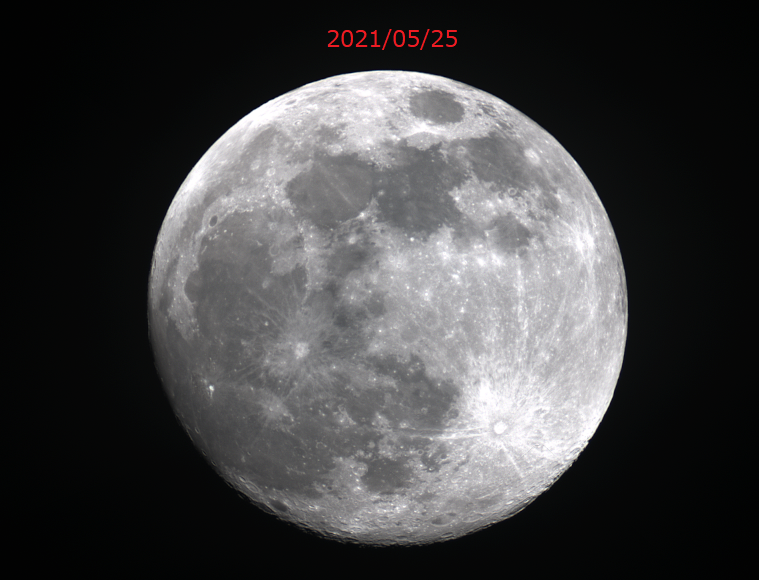
望遠鏡:SV503 ED80 F7(F560mm,D80)
カメラ:ASI1600MC
赤道儀で追尾,200枚撮影しRegistax6でスタック、画像処理
26日は久々の皆既日食。予行を兼ねて前日に撮影を試みました。

望遠鏡:SV503 ED80 F7(F560mm,D80)
カメラ:ASI1600MC
赤道儀で追尾,200枚撮影しRegistax6でスタック、画像処理
このサイトの手順に従ってインストール:
カメラ動画の認識実行例:
航空機の映像が小さい(遠方の目標)と、凧(kite)や鳥(bird)として誤認識されることが多い。再生速度を遅くしてご覧ください。
手順の全般
Step 1a. Update the Raspberry Pi
sudo apt-get update
sudo apt-get dist-upgrade
Step 1b. リポジトリからダウンロードして仮想環境を作成
$ git clone https://github.com/EdjeElectronics/TensorFlow-Lite-Object-Detection-on-Android-and-Raspberry-Pi.git

ディレクトリー名が長いので、短めな名称にリネーム
$ mv TensorFlow-Lite-Object-Detection-on-Android-and-Raspberry-Pi tflite1
$ cd tflite1

virtualenvを利用した仮想環境を構築:
$sudo pip3 install virtualenv
次のコマンドで仮想環境 "tflite1-env" を作成
$ python3 -m venv tflite1-env

"tflite1-env"の活性化
$ source tflite1-env/bin/activate
Step 1c. Install TensorFlow Lite dependencies and OpenCV
$ bash get_pi_requirements.sh
次のURLから、自分の環境にあったバージョンを選んでインストールする。
https://github.com/google-coral/pycoral/releases/
例えば、python3.8 arm64bitの場合
$pip3 install pip3 install https://github.com/google-coral/pycoral/re
leases/download/v1.0.1/tflite_runtime-2.5.0-cp38-cp38-linux_aarch64.whl
Step 1d. Set up TensorFlow Lite detection model
認識のモデルをスクラッチから作るのは大変なので、ここではGoogle’s sampleをダウンロードして拝借
$ wget https://storage.googleapis.com/download.tensorflow.org/models/tflite/coco_ssd_mobilenet_v1_1.0_quant_2018_06_29.zip
$ unzip coco_ssd_mobilenet_v1_1.0_quant_2018_06_29.zip -d Sample_TFLite_model
Step 1e. TensorFlow Lite modelの実行
静止画像、動画、カメラ入力などを対象としたpythonスクリプトが用意されていますが、とりあえず、同梱されているtest.mp4動画でテスト。
$ python3 TFLite_detection_video.py --modeldir=Sample_TFLite_model

別の動画を指定する場合, --videoオプションでファイル名(パス)を指定する。
$ python3 TFLite_detection_video.py --video 動画のファイル名 --modeldir=Sample_TFLite_modelyoutubeから拾ってきた岐阜航空祭の動画で試してみたら、思った以上に良好に検出してくれました。(稀に航空機を凧、鳥と誤認識)
Webカメラを利用する場合は;
$ python3 TFLite_detection_webcam.py --modeldir=Sample_TFLite_modelGoogleの学習済のモデルには、数十種類の認識対象が含まれている。対象のリストはSample_TFLite_modelディレクトリーの中に、labelmap.txtという名称で入っている。同じディレクトリー内に、ファイルdetect.tfliteがあり、これが学習済のデータ(バイナリー)のようだ。
TFLite_detection_video.pyスクリプトを少し改変して、例えば航空機を検出した場合に限定して、検出枠の座標を取り出すこともできたので、これまでに実装したステップモータやサーボモータでカメラを動かす実験と合体させてみたい。
更新:サーボモータで追尾するコード
import time
import math
import datetime
import cv2
import pigpio
import queue
import numpy as np
import sys
from threading import Thread
import importlib.util
import os

face_cascade_path = '/home/pi/opencv/data/haarcascades/haarcascade_frontalface_default.xml'
face_cascade = cv2.CascadeClassifier(face_cascade_path)
usleep = lambda x: time.sleep(x/1000000.0)

TILT=17
PAN=27
RPi=False
GP=pigpio.pi('localhost',8880)
GP.set_mode(PAN,pigpio.OUTPUT)
GP.set_mode(TILT,pigpio.OUTPUT)

# Define VideoStream class to handle streaming of video from webcam in separate processing thread
# Source - Adrian Rosebrock, PyImageSearch: https://www.pyimagesearch.com/2015/12/28/increasing-raspberry-pi-fps-with-python-and-opencv/
class VideoStream:
    """Camera object that controls video streaming from the Picamera"""
    def __init__(self,resolution=(640,480),framerate=30):
        # Initialize the PiCamera and the camera image stream
        self.stream = cv2.VideoCapture(0)
        #self.stream = cv2.VideoCapture('rtsp://admin:@192.168.68.128:554/1/h264major')
        ret = self.stream.set(cv2.CAP_PROP_FOURCC, cv2.VideoWriter_fourcc(*'MJPG'))
        ret = self.stream.set(3,resolution[0])
        ret = self.stream.set(4,resolution[1])

        # Read first frame from the stream
        (self.grabbed, self.frame) = self.stream.read()

        # Variable to control when the camera is stopped
        self.stopped = False

    def start(self):
        # Start the thread that reads frames from the video stream
        Thread(target=self.update,args=()).start()
        return self

    def update(self):
        # Keep looping indefinitely until the thread is stopped
        while True:
            # If the camera is stopped, stop the thread
            if self.stopped:
                # Close camera resources
                self.stream.release()
                return

            # Otherwise, grab the next frame from the stream
            (self.grabbed, self.frame) = self.stream.read()

    def read(self):
        # Return the most recent frame
        return self.frame

    def stop(self):
        # Indicate that the camera and thread should be stopped
        self.stopped = True

def move(p0,p1,dev):
    global tPos,pPos
    global tMin,tMax,pMin,pMax
    if dev==PAN:
        if p1 > pMax or p1 < pMin:
            return
    else:
        if p1 > tMax or p1 < tMin:
            return

    deg=p0
    dx=0.4
    counts=int(abs(p1-p0)/dx)
    if p1<p0:
        dx=-dx
    for i in range(0,counts):
        deg=deg+dx
        pw=500+int(deg*2000/270)
        GP.set_servo_pulsewidth(dev,pw)
        #time.sleep(0.005)
        #GP.set_servo_pulsewidth(dev,0)
        if dev==TILT:
            tPos=deg
        else:
            pPos=deg

def key(k):
    global pPos,tPos,PAN,TILT,track,f_all
    global capture,fontFace,color,Green,Red

    if k == ord('j'):
        new=pPos+2
        move(pPos,new,PAN)
        return
    elif k == ord('k'):
        new=pPos-2
        move(pPos,new,PAN)
        return
    elif k == ord('m'):
        new=tPos-2
        move(tPos,new,TILT)
        return
    elif k == ord('i'):
        new=tPos+2
        move(tPos,new,TILT)
        return
    elif k == ord('p'):
        tmp=input()
        move(pPos,int(tmp),PAN)
    elif k == ord('t'):
        tmp=input()
        move(tPos,int(tmp),TILT)
    elif k == ord('a'):
        f_all = not f_all
    elif k == ord('f'):
        track = not(track)
        if  track:
            color=Red
        else:
            color=Green

    elif k == ord('z'):
        move(tPos,0,TILT)
        move(pPos,90,PAN)

def tracking(dX,dY):
    global xW,yW,pPos,tPos,tW
    ret=False
    if dX >0 :
        move(pPos,pPos+1,PAN)
    elif dX < 0:
        move(pPos,pPos-1,PAN)
    if dY > 0:
        move(tPos,tPos+1,TILT)
    elif dY < 0:
        move(tPos,tPos-1,TILT)
    return ret

# 移動体検知
def detectMOV(tm, tc):
    global avg,  img1,frame
    ret = False
    x,y=0,0
    if avg is None:
        avg = img1.copy().astype("float")
    else:
        cv2.accumulateWeighted(img1, avg, 0.5)
        frameDelta = cv2.absdiff(img1, cv2.convertScaleAbs(avg))
        thresh = cv2.threshold(frameDelta, tm,  255, cv2.THRESH_BINARY)[1]
        #cv2.imshow('th',thresh)
        contours,hierarchy = cv2.findContours(thresh, cv2.RETR_EXTERNAL, cv2.CHAIN_APPROX_SIMPLE)
    #    contours=cv2.drawContours(img,contours,-1,(0,255,0),2)
        for i in range(0,len(contours)):
            if len(contours[i]) > 0:
                 if cv2.contourArea(contours[i]) > tc:
                    rect = contours[i]
                    x, y, w, h = cv2.boundingRect(rect)
                    cv2.rectangle(frame, (x, y), (x + w, y + h), (0, 0, 255), 2)
                    ret=True

    return ret,x,y


def detect_face(frame,gray):
    global xW,yW,xC,yC
    faces = face_cascade.detectMultiScale(gray, scaleFactor=1.3, minNeighbors=5)
    xC,yC=xW,yW
    for x, y, w, h in faces:
        cv2.rectangle(frame, (x, y), (x + w, y + h), (0, 255, 0), 2)
        face = frame[y: y + h, x: x + w]
        try:
            xC,yC=x+w/2,y+h/2
            dX,dY=xC-xW,yC-yW
            if track:
                if(abs(dX)>tW or (abs(dY)>tW)):
                    tracking(dX,dY)
        except:
            xC,yC=xW,yW

if __name__ == "__main__":

    avg=None
    tc=350     # Minimum area  moving detection
    tm=10      # Threshold vale to BINARY
    before = None
    tPos,pPos=0,0
    track=False
    fontFace =cv2.FONT_HERSHEY_SIMPLEX
    Red=(0,0,255)
    Blue=(255,0,0)
    Green=(0,255,0)
    TGT=['airplane','bird','kite']
    #capture = cv2.VideoCapture(1)
    #
    tMin,tMax=0,90  # minimum/Maximum setting for TILT
    pMin,pMax=0,180 # minimum/Maximum setting for PAN
    move(tPos,0,TILT)
    move(pPos,0,PAN)
    wMax=50
    f_count=wMax

    f_all=True
    MODEL_NAME = 'Sample_TFLite_model'
    GRAPH_NAME = 'detect.tflite'
    LABELMAP_NAME = 'labelmap.txt'
    min_conf_threshold = 0.5
    #resW, resH =1280,720
    resW, resH =640,480
    imW, imH = int(resW), int(resH)
    use_TPU = False
    size=(resW, resH)
    Cx=int(resW/2)
    Cy=int(resH/2)
# Import TensorFlow libraries
# If tflite_runtime is installed, import interpreter from tflite_runtime, else import from regular tensorflow
# If using Coral Edge TPU, import the load_delegate library
    pkg = importlib.util.find_spec('tflite_runtime')
    if pkg:
        from tflite_runtime.interpreter import Interpreter
        if use_TPU:
            from tflite_runtime.interpreter import load_delegate
    else:
        from tensorflow.lite.python.interpreter import Interpreter
        if use_TPU:
            from tensorflow.lite.python.interpreter import load_delegate

    # If using Edge TPU, assign filename for Edge TPU model
    if use_TPU:
        # If user has specified the name of the .tflite file, use that name, otherwise use default 'edgetpu.tflite'
        if (GRAPH_NAME == 'detect.tflite'):
            GRAPH_NAME = 'edgetpu.tflite'

    # Get path to current working directory
    CWD_PATH = os.getcwd()

    # Path to .tflite file, which contains the model that is used for object detection
    PATH_TO_CKPT = os.path.join(CWD_PATH,MODEL_NAME,GRAPH_NAME)

    # Path to label map file
    PATH_TO_LABELS = os.path.join(CWD_PATH,MODEL_NAME,LABELMAP_NAME)

    # Load the label map
    with open(PATH_TO_LABELS, 'r') as f:
        labels = [line.strip() for line in f.readlines()]

    # Have to do a weird fix for label map if using the COCO "starter model" from
    # https://www.tensorflow.org/lite/models/object_detection/overview
    # First label is '???', which has to be removed.
    if labels[0] == '???':
        del(labels[0])

    # Load the Tensorflow Lite model.
    # If using Edge TPU, use special load_delegate argument
    if use_TPU:
        interpreter = Interpreter(model_path=PATH_TO_CKPT,
                                  experimental_delegates=[load_delegate('libedgetpu.so.1.0')])
        print(PATH_TO_CKPT)
    else:
        interpreter = Interpreter(model_path=PATH_TO_CKPT)

    interpreter.allocate_tensors()

    # Get model details
    input_details = interpreter.get_input_details()
    output_details = interpreter.get_output_details()
    height = input_details[0]['shape'][1]
    width = input_details[0]['shape'][2]
    W,H = width,height
    xW,yW =int( W/2),int(H/2)
    tW=W/80         # minimum offcenter distance

    floating_model = (input_details[0]['dtype'] == np.float32)

    input_mean = 127.5
    input_std = 127.5
    move(tPos,20,TILT)
    move(pPos,120,PAN)
    # Initialize frame rate calculation
    frame_rate_calc = 1
    freq = cv2.getTickFrequency()

    # Initialize video stream
    videostream = VideoStream(resolution=(imW,imH),framerate=30).start()
    time.sleep(1)
    frame_rate = 24.0 # フレームレート
    now=datetime.datetime.now().strftime("%Y%m%d_%H%M")
    fmt = cv2.VideoWriter_fourcc('m', 'p', '4', 'v') # ファイル形式(ここではmp4)
    writer = cv2.VideoWriter('SV_'+now+'.mp4', fmt, frame_rate, size) # ライター作成
    frames=0
    #for frame1 in camera.capture_continuous(rawCapture, format="bgr",use_video_port=True):
    while True:
        now=datetime.datetime.now().strftime("%Y%m%d_%H:%M:%S")
        # Start timer (for calculating frame rate)
        t1 = cv2.getTickCount()

        # Grab frame from video stream
        frame1 = videostream.read()

        # Acquire frame and resize to expected shape [1xHxWx3]
        frame = frame1.copy()
        frame_rgb = cv2.cvtColor(frame, cv2.COLOR_BGR2RGB)
        frame_resized = cv2.resize(frame_rgb, (width, height))
        input_data = np.expand_dims(frame_resized, axis=0)

        # Normalize pixel values if using a floating model (i.e. if model is non-quantized)
        if floating_model:
            input_data = (np.float32(input_data) - input_mean) / input_std

        # Perform the actual detection by running the model with the image as input
        interpreter.set_tensor(input_details[0]['index'],input_data)
        interpreter.invoke()

        # Retrieve detection results
        boxes = interpreter.get_tensor(output_details[0]['index'])[0] # Bounding box coordinates of detected objects
        classes = interpreter.get_tensor(output_details[1]['index'])[0] # Class index of detected objects
        scores = interpreter.get_tensor(output_details[2]['index'])[0] # Confidence of detected objects
        #num = interpreter.get_tensor(output_details[3]['index'])[0]  # Total number of detected objects (inaccurate and not needed)
        # Draw framerate in corner of frame
        msg='FPS: {0:.2f}'.format(frame_rate_calc)
        msg = msg + ' Track:'+str(track)+ ' F:' + str(frames) + ' T:'+ str(f_all) + ' ' + now
        cv2.putText(frame,msg,(30,50),cv2.FONT_HERSHEY_SIMPLEX,0.8,(255,255,0),1,cv2.LINE_AA)
        # Loop over all detections and draw detection box if confidence is above minimum threshold
        for i in range(len(scores)):
            object_name = labels[int(classes[i])] # Look up object name from "labels" array using class index
            if f_all or (object_name in TGT):
                if ((scores[i] > min_conf_threshold) and (scores[i] <= 1.0)):
                    # Get bounding box coordinates and draw box
                    # Interpreter can return coordinates that are outside of image dimensions, need to force them to be within image using max() and min()
                    ymin = int(max(1,(boxes[i][0] * imH)))
                    xmin = int(max(1,(boxes[i][1] * imW)))
                    ymax = int(min(imH,(boxes[i][2] * imH)))
                    xmax = int(min(imW,(boxes[i][3] * imW)))
                    x,y=Cx,Cy
                    if (xmax-xmin)*(ymax-ymin)<10000:
                        x=xmin+int((xmax-xmin)*0.5)
                        y=ymin+int((ymax-ymin)*0.5)
                        if f_all:
                            # Draw label
                            label = '%s: %d%%' % (object_name, int(scores[i]*100))
                            labelSize, baseLine = cv2.getTextSize(label, cv2.FONT_HERSHEY_SIMPLEX, 0.7, 2) # Get font size
                            label_ymin = max(ymin, labelSize[1] + 10) # Make sure not to draw label too close to top of window
                            cv2.rectangle(frame, (xmin,ymin), (xmax,ymax), (10, 255, 0), 2)
                            cv2.rectangle(frame, (xmin, label_ymin-labelSize[1]-10), (xmin+labelSize[0], label_ymin+baseLine-10), (255, 255, 255), cv2.FILLED) # Draw white box to put label text in
                            cv2.putText(frame, label, (xmin, label_ymin-7), cv2.FONT_HERSHEY_SIMPLEX, 0.7, (0, 0, 0), 2) # Draw label text
                        else:
                            x=xmin+int((xmax-xmin)*0.5)
                            y=ymin+int((ymax-ymin)*0.5)
                            cv2.circle(frame,(x,y),4,color=Green,thickness=1)
                            cv2.circle(frame,(x,y),10,color=Green,thickness=1)
                            cv2.circle(frame,(x,y),16,color=Green,thickness=1)
                            frames=frames+1
                            writer.write(frame)
                            f_count=wMax
                        dW = Cx - x
                        dH = Cy - y
                        msg='dW:'+str(dW)+' dH:'+ str(dH)
                        cv2.putText(frame, msg, (30, 80), cv2.FONT_HERSHEY_SIMPLEX, 0.7, (255, 0, 0), 1)
                        #msg=tgt_track(track,dH,dW,tH,tW,ptz,moverequest)
                        msg=tracking(dW,dH)

        # All the results have been drawn on the frame, so it's time to display it.
        cv2.imshow('Object detector', frame)
        if f_count>0 and f_count !=wMax:
            if not f_all:
                writer.write(frame)
        f_count=f_count-1
        # Calculate framerate
        t2 = cv2.getTickCount()
        time1 = (t2-t1)/freq
        frame_rate_calc= 1/time1
        # Press 'q' to quit
        k=cv2.waitKey(1) & 0xFF
        key(k)
        if k == ord('q'):
            break
        for i in range(5):
            frame1 = videostream.read()
    # Clean up
    cv2.destroyAllWindows()
    videostream.stop()
    if writer is not None:
        writer.release()
    move(tPos,10,TILT)
    move(pPos,90,PAN)
    GP.stop()
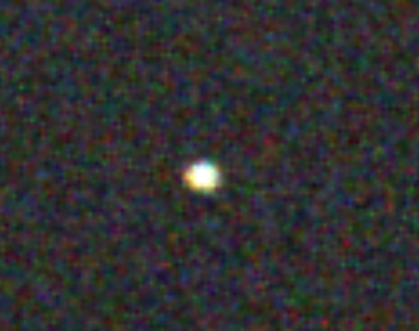
print('Finish!')カメラのビニング設定ミスとバーローレンズなしで撮影したため、ISSの画像が小さすぎ。
プラグインWP Mail SMTPをインストール。設定の手順は、WP Mail SMTPのドキュメントを参照。
WP Mail SMTPのドキュメント:
https://wpmailsmtp.com/docs/how-to-set-up-the-gmail-mailer-in-wp-mail-smtp/#create-app
Gmailを利用して、上記のURLを参照しながら設定を完了させ、無事利用できるようになった。Google APIを利用するためのクライアントIDとクライアントシークレットをGoogleから取得することが必要。(手順は、上記URLのドキュメントに詳しく書かれている)
こんな記事を発見:RPi.GPIOよりもpigpioの方が精度が良いらしい。
「RPi.GPIO と pigpio のパルス幅の精度を測定」
テストのコード
#!/usr/bin/python
# -*- coding: utf-8 -*-
import time
import pigpio
PAN=27
GP = pigpio.pi()
GP.set_mode(PAN, pigpio.OUTPUT)
GP.set_servo_pulsewidth(PAN, 500)   # gpio18   500us

time.sleep(60)
GP.stop()
実測結果
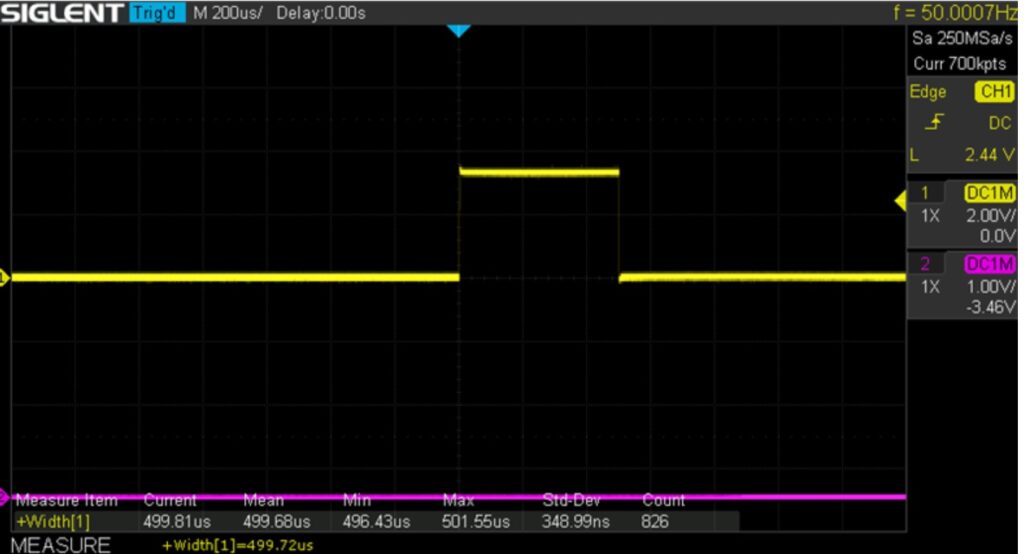
標準偏差が348nSと、OSのオーバーヘッドがないArduinoと比較すると2桁程大きいが、サーボモータの制御には十分な精度が得られそう、、、
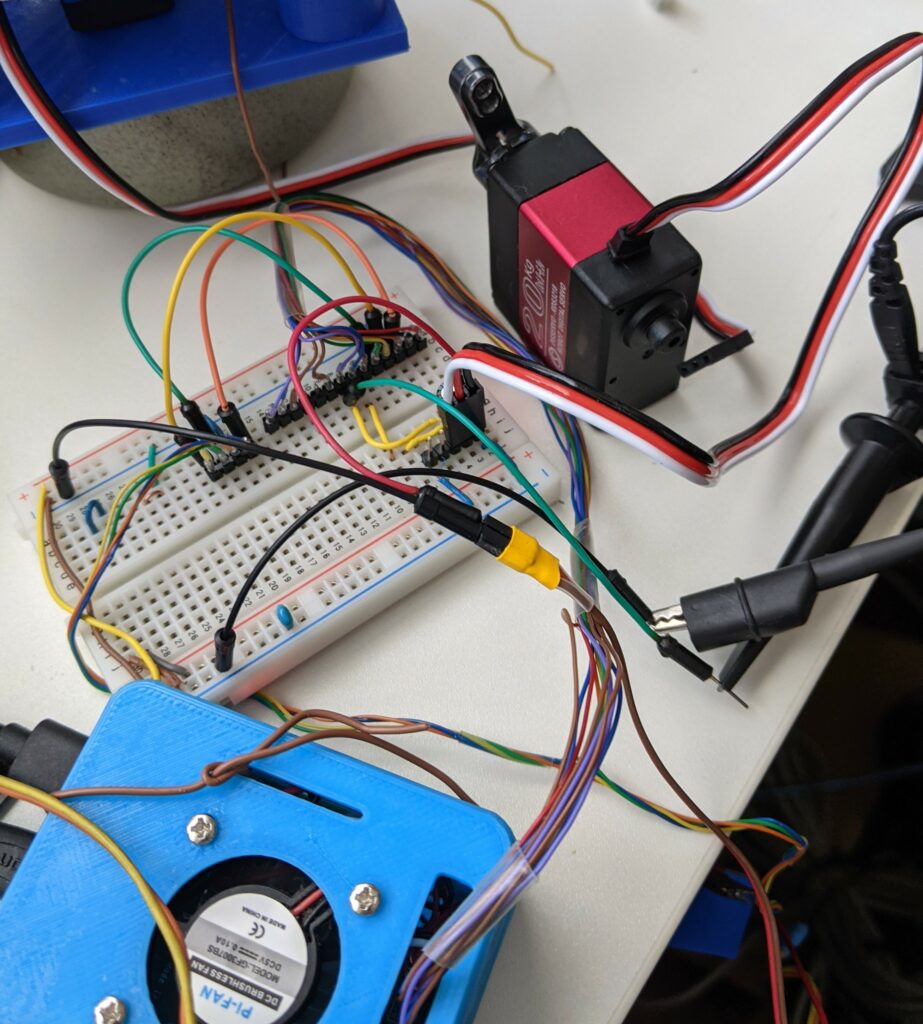
サーボモータでPan/Tiltカメラ台を制御する実験をやってみたが、意図した方向から少し外れては正しい方向へカメラ台が回転する現象が頻発している。ステッピングモータの時には、このような現象に遭遇した記憶がない。サーボモータは、制御信号のパルス幅に対応した角度まで回転するように作られているので、意図しない回転の原因は、次のように推定できる。
安価なサーボモータを使っているので、最初はサーボモータの精度の問題と思ったりしたが、制御信号のパルス幅をオシロで観測してみることにした。オシロには測定した値の統計情報を表示する機能があり、パルス幅の評価にはこれを利用することにした。
サーボモータの制御は、次のPythonスクリプトでRaspberry pi4bのGPIOからPWM信号を発生させて行っている。500HzでDuty50%の矩形波を生成。
#GPIOの初期設定
import RPi.GPIO as GPIO
GPIO.setwarnings(False)
GPIO.setmode(GPIO.BCM)
PAN=27
GPIO.setup(PAN, GPIO.OUT)
PWM_pan = GPIO.PWM(PAN, 500)
PWM_pan.start(0.0)

PWM_pan.ChangeDutyCycle(50)
while True:
    pass
オシロで観測した波形と統計情報
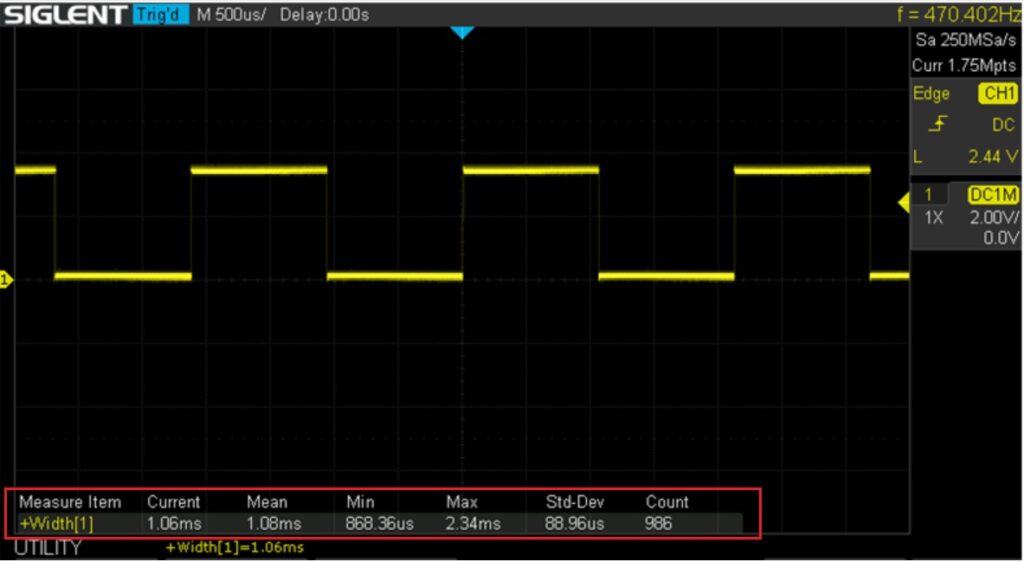
赤枠部分に表示された情報を信用すると、パルス幅の平均値が1.08mS、最大値が2.34mS、標準偏差が88.96μなどどなっている。ここで、利用したサーボモータは0.5mSから2.5mSの制御信号のパルス幅に対応して、270度の範囲で回転することになっている。回転角度を1度変更するにために必要なパルス幅の変化は、約4.7μS(=2mS/270)。ところが、観測したパルス幅の標準偏差が88.96μということなので、サーボモータが制御信号に忠実に反応した場合、回転角度が数度以上変動することになる。実際に、この制御信号をサーボモータへ与えると、モータは静止せずに微動を繰り返す状態となった。
制御パルス生成にArduino Microを用いた場合
PIN6からPWM信号を生成
int PAN = 6;

void setup() {
  pinMode(PAN, OUTPUT);
  analogWrite(PAN,128);
}

void loop() {
}
オシロで観測した様子
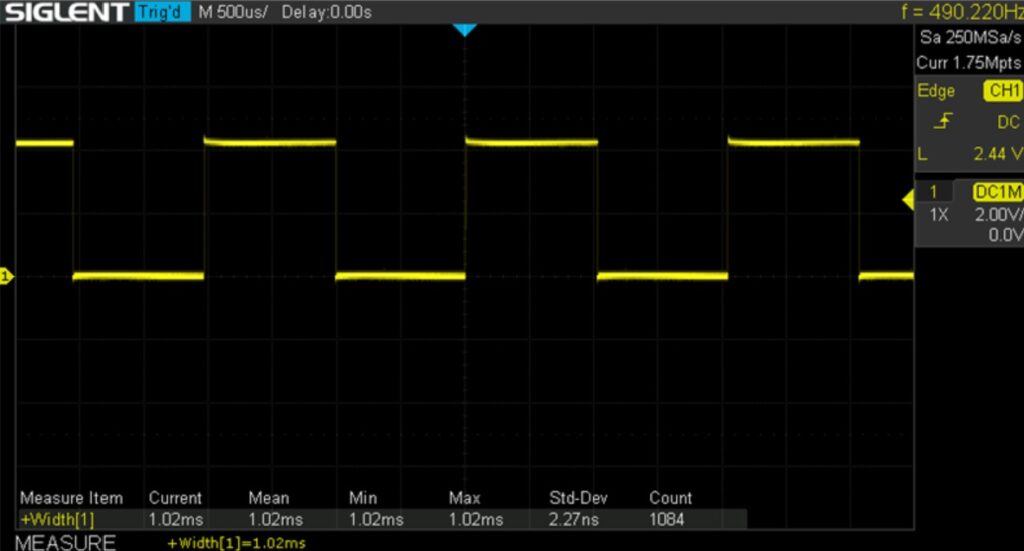
なんと標準偏差が1桁のnSオーダー。Raspberry Pi4の1/1000以下となりました。
以前、ステッピングモータでPan/Tilt制御可能なカメラマウントを作ってみましたが、今回はサーボモータを利用してみました。サーボモータは、手軽にドライブできる利点はありものの、角度の情報を取り出す仕組がないという利用目的次第では致命的な欠点もあることに気が付きました。特にTilt方向が問題で、気を付けないとマウントに搭載しているカメラが座台と干渉し、カメラなどを破損する可能性があります。
ステッピングモータでPan/Tiltの制御し、画像の重心を追尾する実験の様子。