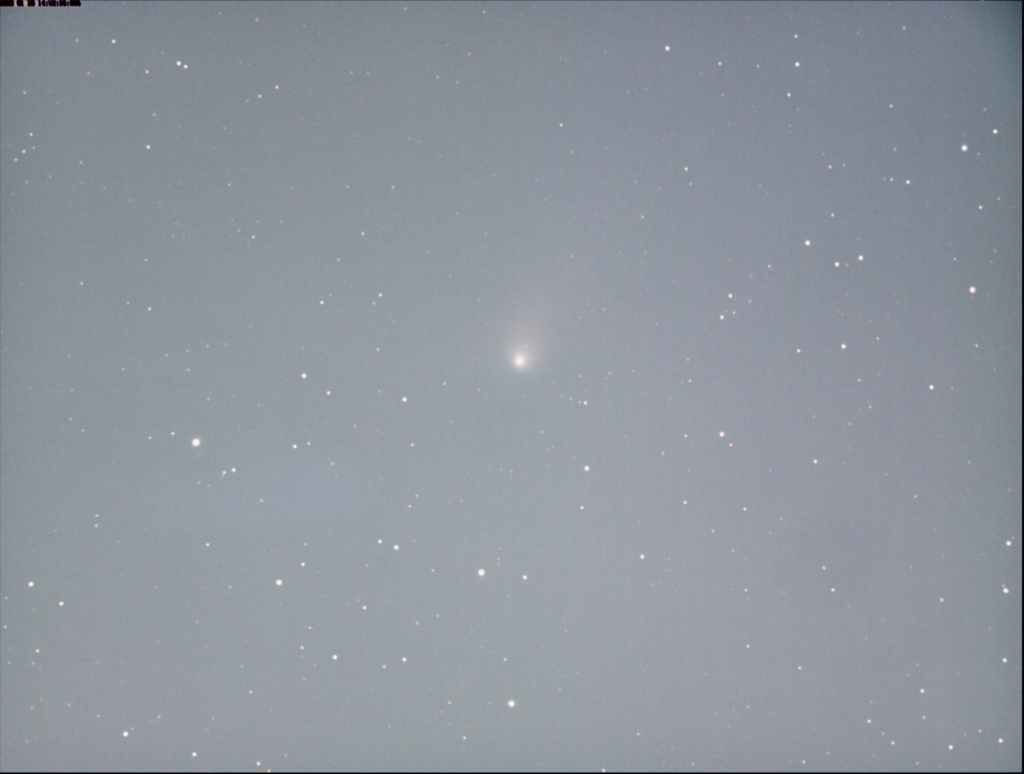
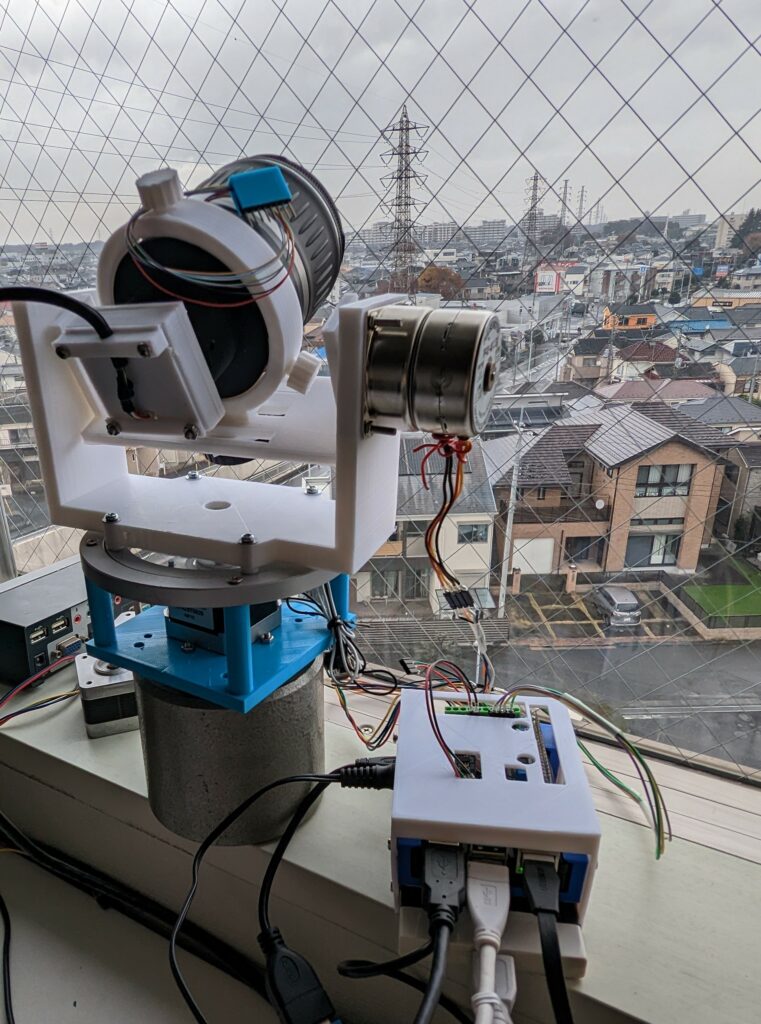
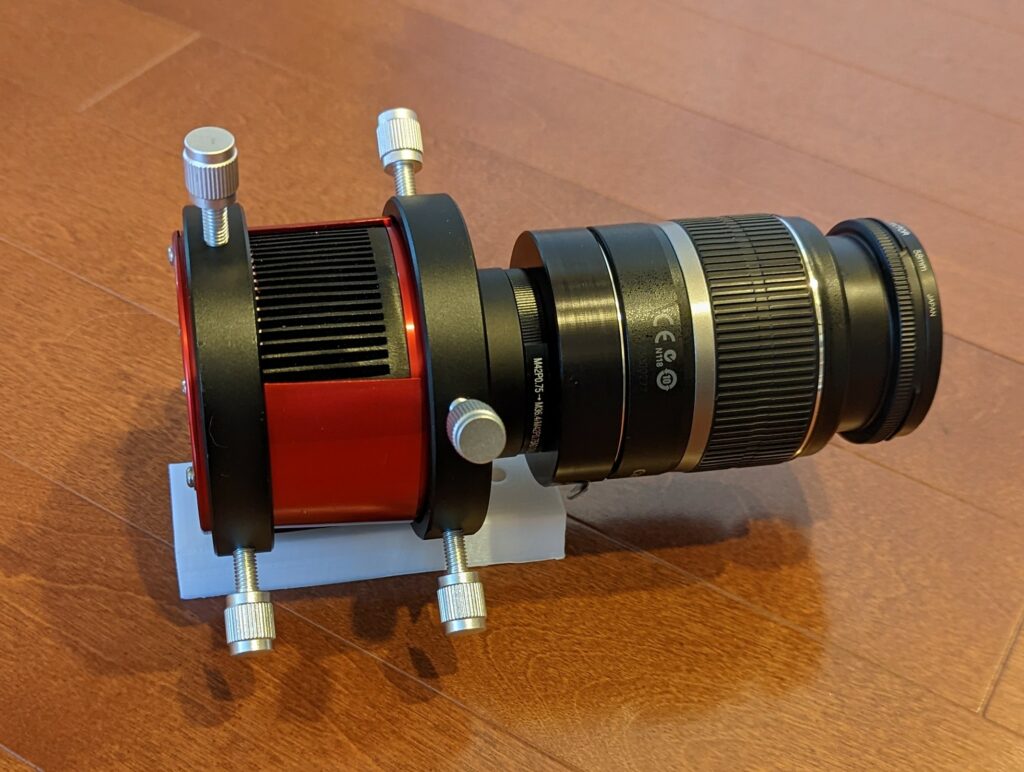
1月20日

C/2022 E3(ZTF)彗星 1月17日
1月20日

C/2022 E3(ZTF)彗星 1月17日
コマンドプロンプトで、以下のコマンドを実行する。
powershell start-process cmd -verb runas
Windows10/11の破損したシステムファイルを修復
管理者権限のPowershellから次を実行
sfc /scannow
Windows リソース保護により、破損したファイルが見つかりましたが、それらの一部は修復できませんでした。
オンライン修復の場合、詳細は次の場所にある CBS ログ ファイルに含まれています
windir\ Logs\CBS\CBS.log (たとえば C:\Windows\Logs\CBS\CBS.log)。オフライン修復の場合、
詳細は /OFFLOGFILE フラグによって指定したログ ファイルに含まれています。

import cv2
import time
import pigpio
import datetime
import threading
import os

pi = pigpio.pi()
sMin=0.005
sMax=0.0002
STP1 = 19
DIR1 = 13
EBL1 = 12
STP2 = 18
DIR2 = 24
EBL2 = 4
M=1/32   # microstep
N=200   # stepper
FOV = 20 # Field of view
R=M*360/N       # 1-Stepの回転角度
RR= 1 / R       # 1度の回転に必要なSTEP数
pX=0
pY=0
cAz = 0
cEv = 0
track = False
mode ='F'
reverse = False
Limit = False
circle = True
th = 170
LowEv,HighEv = 0, 80
RightAz, LeftAz = 0,100
cAz, cEv = 0, 0
oAz, oEv = 55, 45
pi.set_mode(STP1,pigpio.OUTPUT)
pi.set_mode(DIR1,pigpio.OUTPUT)
pi.set_mode(EBL1,pigpio.OUTPUT)
pi.set_mode(EBL2,pigpio.OUTPUT)
pi.set_mode(STP2,pigpio.OUTPUT)
pi.set_mode(DIR2,pigpio.OUTPUT)
delay_Az = 0.0005
delay_Ev = 0.002

def goto(oAz,oEv):
    global cAz,cEv,STP1,STP2,DIR1,DIR2,delay_Az,delay_Ev
    tA, tE = oAz - cAz, oEv - cEv
    rotAz(tA)
    rotEv(tE)

def key(k):
    global cAz,cEv,STP1,DIR1,STP2,DIR2,th
    global track,reverse,circle,dW,dH,Limit
    global LowEv,HighEv ,RightAz, LeftAz
    if k == ord('b'):
        cAz = 0
        cEv = 0
    elif k == ord('j') or k==81:
        rotAz(-0.5625)
    elif k == ord('J'):
        LeftAz=round(cAz,1)
    elif k == ord('k') or k==83:
        rotAz(0.5625)
    elif k == ord('K'):
        RightAz=round(cAz,1)
    elif k == ord('h'):
        rotAz(-5.625)
    elif k == ord('l'):
        rotAz(5.625)
    elif k == ord('i') or k==82:
        rotEv(1)
    elif k == ord('I'):
        HighEv=round(cEv,1)
    elif k == ord('m') or k==84:
        rotEv(-1)
    elif k == ord('o'):
        goto(30,40)
    elif k == ord('M'):
        LowEv=round(cEv,1)
    elif k == ord('a'):
        th = th - 2
    elif k == ord('s'):
        th = th + 2
    elif k == ord('t'):
        track = not track
    elif k == ord('p'):
        Limit = not Limit
    elif k == ord('r'):
        reverse = not reverse
    elif k == ord('@'):
        print('AzL=',round(LeftAz,1),',AzR=',round(RightAz,1),',EvH=',round(HighEv,1),',EvL=',round(LowEv,1))
    elif k == ord('c'):
        cAz, cEv = 10, 22
        LeftAz, RightAz = -9, 157
        HighEv, LowEv = 70, 20
    elif k == ord('z'):
        tmp=input()
        tmp=tmp.split(',')
        cAz = float(tmp[0])
        cEv = float(tmp[1])
    elif k == ord('x'):
        tmp=input()
        tmp=tmp.split(',')
        dW = float(tmp[0])
        dH = float(tmp[1])
        mH, mW = dH - cEv, dW - cAz
        print('Az:',cAz,' Ev:',cEv,' dW:',mW,' dH:',mH)

        rotAz(mW)
        rotEv(mH)
        cAz, cEv = dW, dH

def do_move(N,STP,delay):
    #print(N,STP,delay)
    for i in range(N):
        pi.write(STP,1)
        time.sleep(delay)
        pi.write(STP,0)
        time.sleep(delay)
    pi.write(EBL1,0)

def check(Az,Ev):
    global LowEv,HighEv ,RightAz, LeftAz
    AzR,AzL,EvH,EvL = False,False,False,False
    f = False
    if Az> RightAz:
        AzR, f =True, True
    if Az< LeftAz:
        AzL, f=True, True
    if Ev>HighEv:
        EvH, f=True, True
    if Ev<LowEv:
        EvL, f=True, True
    return f,AzR,AzL,EvH,EvL

def rotAz(deg):
    pi.write(EBL2,1)
    rot(deg,STP2,DIR2, delay_Az)

def rotEv(deg):
    pi.write(EBL1,1)
    #time.sleep(0.5)
    rot(deg,STP1,DIR1, delay_Ev)

def rot(deg,STP,DIR,delay):
    global cEv,cAz,LeftAz,LowEv,HighEv
    tmp=deg
    if tmp<0:
        dDIR=1
        tmp=-tmp
    else:
        dDIR=0

    if STP==STP2:
        N=int(0.5+200*32*tmp/360)
        if Limit:
            if AzL and (cAz > LeftAz):
                N = 0
            if AzR and (cAz < RightAz):
                N = 0
        if N != 0:
            cAz=cAz+deg
    else:
        N=int(0.5+48*120*tmp/360) # 48/360 1/120 gear and Full STEP
        if Limit:
            if EvL and (cEv<LowEv):
                N = 0
            if EvH and (cEv>HighEv):
                N = 0
        if N != 0:
            cEv=cEv+deg
    pi.write(DIR,dDIR)
    do_move(N,STP,delay)
    #thread2 = threading.Thread(target= do_move,args=(N,STP,delay,))
    #thread2.start()

def jyusin(img):
    global W2,H2
    mu = cv2.moments(img, False)
    try:
        x,y= int(mu["m10"]/mu["m00"]) , int(mu["m01"]/mu["m00"])
        c=(0,255,0)
        focus = True
    except ZeroDivisionError:
        x = W2
        y = H2
        c=(0,0,255)
        focus = False
    return focus,x,y,c

def finish(n):
    global writer,track,Limit,f_name
    print(f_name,'closed')
    writer.release()
    new_name=f_name.replace('.avi','-'+str(n)+'.avi')
    os.rename(f_name,new_name)
    writer ,f_name= None, ""
    track = False
    Limit = False
    goto(55,50)
    track = True
    Limit = True

fontFace =cv2.FONT_HERSHEY_SIMPLEX
# VideoCapture オブジェクトを取得します
capture = cv2.VideoCapture(0)
#capture.set(cv2.CAP_PROP_FOURCC, cv2.VideoWriter_fourcc(*'mp4v')
capture.set(cv2.CAP_PROP_FRAME_WIDTH, 1920)
capture.set(cv2.CAP_PROP_FRAME_HEIGHT, 1080)
capture.set(cv2.CAP_PROP_FOURCC, cv2.VideoWriter_fourcc(*"MJPG"))
# 幅
W = int(capture.get(cv2.CAP_PROP_FRAME_WIDTH))
# 高さ
H = int(capture.get(cv2.CAP_PROP_FRAME_HEIGHT))
print('Size W:',W,'  H:',H)
half = False
W2, H2 = int(W/2), int(H/2)
WW, HH = W2, H2
if W>1024:      # resize
    W2, H2=int(W/4), int(H/4)
    half = True
fourcc = cv2.VideoWriter_fourcc(*'h264')
fourcc = cv2.VideoWriter_fourcc(*'XVID')
#fourcc = cv2.VideoWriter_fourcc(*'mp4v')
writer = None
PATH="/home/mars/pWork/"
AzR,AzL,EvH,EvL = False,False,False,False
f_name=""
i=0
white,blue,red,green=(255,255,255),(255,0,0),(0,0,255),(0,255,000)
config='optrack.ini'
if os.path.exists(config):
    f = open(config)
    s = f.read()
    t = s.split(',')
    cAz, cEv, LowEv, HighEv ,RightAz, LeftAz = float(t[0]),float(t[1]),float(t[2]),float(t[3]),float(t[4]),float(t[5])

while(True):
    ret, frame = capture.read()
    if half:
        frame = cv2.resize(frame, dsize=(WW, HH))
    now=datetime.datetime.today()
    if reverse:
        img1 =  cv2.cvtColor(cv2.bitwise_not(frame) ,cv2.COLOR_BGR2GRAY)
    else:
        img1 = cv2.cvtColor(frame ,cv2.COLOR_BGR2GRAY)
    # 二値化(閾値100を超えた画素を255にする
    ret, img_th = cv2.threshold(img1, th, 255, cv2.THRESH_BINARY)
    cv2.imshow('frame2',img_th)
    k=cv2.waitKey(1) & 0xFF
    key(k)
    if k == ord('q'):
        break

    # 重心検出
    focus,x,y,c = jyusin(img_th)
    cc = white
    if focus:
        if track:
            i=i+1
            if writer is None:
                f_name ='video/'+now.strftime("%Y-%m-%d_%H:%M:%S")+'.avi'
                writer=cv2.VideoWriter(f_name, fourcc, 15, (WW,HH))
                print('Record Start:',f_name)
                time_start = time.time()
            else:
                writer.write(frame)
                cc = green
                if (time.time() - time_start) >20:
                    finish(i)
                    i = 0
        else:
            if writer is not None:
                finish(i)
                i = 0

    else:
        if (writer is not None):
            writer.write(frame)
            if  ((time.time()- time_start)>20):
                finish(i)
                i = 0

    if circle:
        cv2.circle(frame, (x,y), 4, color=c, thickness=1)
        cv2.circle(frame, (x,y), 10, color=c, thickness=1)
        cv2.circle(frame, (x,y), 16, color=c, thickness=1)

    f, AzL,AzR,EvH,EvL=check(cAz,cEv)
    cf = green
    if f:
        cf = red
    dW = (WW*0.5 - x)*0.001
    if track and abs(dW)>0.02:
        rotAz(-dW)    #  cAz = cAz + dW * R

    dH = (HH*0.5 - y)*0.001
    if track and abs(dH)>0.02:
        rotEv(dH)     # cEv = cEv + dH*R

    text='T:'+str(track)+' L:'+str(Limit)+' '+now.strftime("%H:%M:%S")+ ' TH=' +str(th)+'  X='+str(x)+'  Y='+str(y)+" F#:"+str(i)+" File:"+f_name
    text2="Az:"+str(round(cAz,2))+"  Ev:"+str(round(cEv,2))+" F:"+str(f)+"  AzL:"+str(AzL)+" AzR:"+str(AzR)+" EvH:"+str(EvH)+" EvL:"+str(EvL)
    text3="Az_step:"+str(round(dW,2))+"  Ev_step:"+str(round(dH,2)) + " Video Reverse:" + str(reverse)
    text4="AzL:"+str(LeftAz)+" AzR:"+str(RightAz)+" EvH:"+str(HighEv)+" EvL:"+str(LowEv)
    img = cv2.putText(frame, text, (10,20), fontFace, 0.5,color=cc)
    img = cv2.putText(frame, text2, (10,40), fontFace, 0.5,color=cf)
    img = cv2.putText(frame, text3, (10,60), fontFace, 0.5,color=cc)
    img = cv2.putText(frame, text4, (10,80), fontFace, 0.5,color=cc)
    cv2.imshow('frame',img)

print('Done!')
f=open(config,'w')
msg=str(cAz)+','+str(cEv)+','+str(LowEv)+','+str(HighEv)+','+str(RightAz)+','+str(LeftAz)
f.write(msg)
f.close()
capture.release()
if writer is not None:
    writer.release()
cv2.destroyAllWindows()
pi.write(EBL1,0)
pi.write(EBL2,0)参照URL: WSL2 USBカメラ+他のUSB機器 2022年09月06日版
USBデバイスの種類によっては、カーネル再構築が必要のようだ。https://zenn.dev/pinto0309/articles/e1432253d29e30
>usbipd wsl list
BUSID  VID:PID    DEVICE                                                        STATE
1-4    03c3:290a  ZWO ASI290MC Camera                                           Not attached
1-6    31b2:0010  KT USB Audio, USB 入力デバイス                                Not attached
1-8    8087:0a2a  インテル(R) ワイヤレス Bluetooth(R)                           Not attached
2-3    05e3:0749  USB 大容量記憶装置                                            Not attached
4-1    056e:00e7  USB 入力デバイス                                              Not attached
4-2    328f:2015  eMeet Nova, USB 入力デバイス                                  Not attached
5-2    1908:2220  USB 大容量記憶装置, USB2.0 Device, USB 入力デバイス           Not attached
5-3    1b1c:1b73  USB 入力デバイス                                              Not attached
5-4    8086:0808  USB PnP Sound Device, USB 入力デバイス                        Not attached
deviceのattach
>usbipd wsl attach --busid 4-2
usbipd: info: Using default WSL distribution 'Ubuntu-20.04'; specify the '--distribution' option to select a different one.

>usbipd wsl list
BUSID  VID:PID    DEVICE                                                        STATE
1-6    31b2:0010  KT USB Audio, USB 入力デバイス                                Not attached
1-8    8087:0a2a  インテル(R) ワイヤレス Bluetooth(R)                           Not attached
1-12   03c3:290a  ZWO ASI290MC Camera                                           Not attached
2-3    05e3:0749  USB 大容量記憶装置                                            Not attached
4-1    056e:00e7  USB 入力デバイス                                              Not attached
4-2    328f:2015  eMeet Nova, USB 入力デバイス                                  Attached - Ubuntu-20.04
5-2    1908:2220  USB 大容量記憶装置, USB2.0 Device, USB 入力デバイス           Not attached
5-3    1b1c:1b73  USB 入力デバイス                                              Not attached
5-4    8086:0808  USB PnP Sound Device, USB 入力デバイス                        Not attached
ビデオデバイス:wsl2_linux_kernel_usbcam_enable_conf
https://github.com/PINTO0309/wsl2_linux_kernel_usbcam_enable_conf
起動しなくなったWSL2を復活させるまでにしたあれこれ
.wslconfigを退避して復帰で救われた! ユーザ/xxxxx/.wslconfig
参考情報 USBカメラの情報をv4l2-ctl取得・設定
Ubuntu 20.04 LTSでUSB接続のWEBカメラを使う
// 利用可能なWEBカメラの一覧を表示しています
$ v4l2-ctl --list-devices
//#デバイスの全ての情報を表示します
v4l2-ctl -d /dev/video2 --all

// 接続しているUSBカメラの全情報出力
$ v4l2-ctl --all
// USBカメラが対応している設定項目一覧を確認するには

$ v4l2-ctl -L

設定の確認は以下で行います。
$ v4l2-ctl -C <設定項目名>

設定は以下で行います。
$ v4l2-ctl -c <設定項目名>=値

解像度とフレームレートの取得
$ v4l2-ctl --list-formats-ext利用ソフト:dump1090-faとpysynscan + 自作のpythonスクリプト
ADSB受信用SDR:RTL-SDR RTL2832U
カメラ制御用経緯台: SkyWatcherのAz-GTi
カメラ:ASI1600MC-COOL + カメラ用レンズ

撮影画像例:距離 10000m程度

おまけ
スマホで航空機を撮影:距離500m程度??
撮影場所、時刻、方向:スマホのGPS情報、加速度センサー等から取得
アメダスは:降水量を観測する観測所は全国に約1,300か所

問題点:
(1)経緯台の回転速度が比較的遅いので、カメラの指向が間に合わないことがある。
(2)航空機までの距離が遠いことが多く、200mm程度の望遠レンズでは、画像から機種の判別は困難
STEP1:ADSBの電波を受信し、航空機のICAOコードと位置(緯度、経度、高度)を取得。
STEP2:航空機の位置(緯度、経度、高度)と、観測場所の緯度、経度から航空機が見える方位と見上げ角度を計算。
STEP3:経緯台のモータを、航空機の方向に向ける。
STEP4:画像を撮影
# -*- coding: utf-8 -*-
from  math import *
import time,datetime
import os
import socket
import logging
import synscan
from optparse import OptionParser

PORT = 30003           # Running dump1090-fa
host = '192.168.68.61' #
BUFFER_SIZE = 1024

R_EARTH = 6378137
RAD = 3.14159265 / 180
LAT0,LON0=35.7973, 139.4462

parser = OptionParser()
parser.add_option("-r","--range",action="store",dest="MAX", default=0,type="int",help="Max range")
parser.add_option("-t","--tilt",action="store",dest="TILT_MIN", default=1,type="float",help="Min tilt")
(opts, args) = parser.parse_args()
MAX=opts.MAX
TILT_MIN=opts.TILT_MIN
#MAX = 20000
if MAX == 0:
    TEST = True
    pH,pT = 0,0
    MAX = 50000
    print("Test mode")
else:
    TEST = False
    smc=synscan.motors(udp_ip='192.168.68.200', udp_port=11880)
    pH,pT = smc.axis_get_pos(1),smc.axis_get_pos(2)
    print('Last PAN,TILT:',pH,pT)

H_MIN ,T_MIN = 0.1, 0.1

def distance(lat1,lon1,lat2,lon2):
    lat1,lat2 = lat1*RAD, lat2*RAD
    lon1,lon2 = lon1*RAD, lon2*RAD
    lat_c = (lat1 + lat2) / 2
    try:
       dx = R_EARTH*(lon2-lon1)*cos(lat_c)
       dy = R_EARTH*(lat2-lat1)
    except:
        dx,dy = 100000, 100000
        pass

    return sqrt(dx*dx + dy*dy)

def azimuth(y1,x1,y2,x2):
        x1=radians(x1)
        y1=radians(y1)
        x2=radians(x2)
        y2=radians(y2)

        deltax = x2 - x1
        ans = degrees(atan2(sin(deltax),(cos(y1)*tan(y2)-sin(y1)*cos(deltax))))%360
        return ans

Buf = {}
dBuf= {}
T_MAX, L_MAX = 0.5,10
dH, dT = 0, 0
start=time.time()
TGT=None
seq = 0
with socket.socket(socket.AF_INET, socket.SOCK_STREAM) as s:
    s.connect((host, PORT))
    while True:
        str = s.recv(BUFFER_SIZE).decode()
        if 'MSG,3' in str:
            t = str.split(',')
            try:
                ID, Lat, Lon, Alt = t[4],t[14],t[15],t[11]
                LAT=float(Lat)
                LON=float(Lon)
                ALT=float(Alt)
            except:
                LAT, ALT = 0, 0
                pass
            if LAT>0 and ALT>0:
                dist = round(distance(LAT0, LON0, LAT, LON),1)
                if dist<MAX:
                    houi = round(azimuth(LAT0, LON0, LAT, LON),1) + 5 + dH
                    tilt = round(degrees(atan(ALT*0.3048/dist)),1) + 3 + dT
                    Buf[ID] ={'TIME':round(time.time(),0),'DIST':dist,'PAN':houi,'TILT':tilt}
                    dBuf[ID]=dist
                else:
                    pass
            if time.time()-start > T_MAX:
                now = time.time()
                start = time.time()
                os.system('clear')

                print('---',datetime.datetime.now(),'---','ICAO:',TGT,' PAN:',pH,' TILT:',pT)
                for k,v in list(Buf.items()):
                    last = Buf[k]['TIME']
                    if now - last > L_MAX:
                        print('deleted..',k)
                        del Buf[k]
                        if k == TGT:
                            TGT = None
                print('TGT:',TGT)
                for k,v in Buf.items():
                    if (TGT is None) or (TGT not in Buf):
                        TGT = k
                        print('New target:',TGT)
                        seq = 1
                        dH, dT = 0,0
                    print(k,v)
        if TGT is not None and TGT in Buf:
            houi, tilt = Buf[TGT]['PAN'], Buf[TGT]['TILT']
            #pH,pT = smc.axis_get_pos(1),smc.axis_get_pos(2)
            dH, dT = round(pH - houi,1), round(pT - tilt,1)
            if (abs(dH)>H_MIN or abs(dT)>T_MIN) and tilt>TILT_MIN and (houi<200 and tilt<80):
                pH, pT = houi, tilt
                print('*',TGT, houi,'(',dH,')', tilt,'(',dT,')','SEQ:',seq)
                seq = seq + 1
                if not TEST :
                    smc.goto(houi,tilt,syncronous=False)
            else:
passssh serviceの自動起動設定
https://buzz-server.com/tech/ubuntu-ssh/
echo 'none none rc defaults 0 0' | sudo tee -a /etc/fstab
echo '#!/bin/bash' | sudo tee /sbin/mount.rc
echo 'sudo service ssh start' | sudo tee -a /sbin/mount.rc
sudo chmod +x /sbin/mount.rc
$sudo ssh-keygen -A を実行
password認証を有効にするには、/etc/ssh/sshd_configを修正する。
ポート転送の設定PowerShell スクリプト
https://neos21.net/blog/2021/07/20-01.html
if (!([Security.Principal.WindowsPrincipal][Security.Principal.WindowsIdentity]::GetCurrent()).IsInRole("Administrators")) { Start-Process powershell.exe "-File `"$PSCommandPath`"" -Verb RunAs; exit }

$ip = bash.exe -c "ip r |tail -n1|cut -d ' ' -f9"
if( ! $ip ){
  echo "The Script Exited, the ip address of WSL 2 cannot be found";
  exit;
}

# All the ports you want to forward separated by comma
$ports=@(22,8501,8888);
$ports_a = $ports -join ",";

# Remove Firewall Exception Rules
iex "Remove-NetFireWallRule -DisplayName 'WSL 2 Firewall Unlock' ";

# Adding Exception Rules for inbound and outbound Rules
iex "New-NetFireWallRule -DisplayName 'WSL 2 Firewall Unlock' -Direction Outbound -LocalPort $ports_a -Action Allow -Protocol TCP";
iex "New-NetFireWallRule -DisplayName 'WSL 2 Firewall Unlock' -Direction Inbound -LocalPort $ports_a -Action Allow -Protocol TCP";

for( $i = 0; $i -lt $ports.length; $i++ ){
  $port = $ports[$i];
  iex "netsh interface portproxy add v4tov4 listenport=$port listenaddress=* connectport=$port connectaddress=$ip";
}

# Show proxies
iex "netsh interface portproxy show v4tov4";
ポート転送の削除 netsh.exe interface portproxy delete v4tov4 listenport=22
Windows FireWallの設定(解放)
https://qiita.com/DR623G/items/20e1d95e25e4ae658a33
netsh advfirewall firewall add rule name="WSL2" dir=in action=allow protocol=TCP localport=22設定の確認
netsh advfirewall firewall show rule name="WSL2" verbose素数を求める
PHP
Counts; 9592
Start: 1665640247.3987, End: 1665640871.2338
Elapsed: 623.83505320549
python
見つかった素数の数は9592 個です。
かかった時間は712.5231149196625秒です。
mars@ps2:~/work $ python3 prime.py
見つかった素数の数は9592 個です。
かかった時間は771.8856158256531秒です。
golang
見つかった素数の数は9592個です。
かかった時間は12.71028914秒です。
月のすぐ左に木星が輝いていたので撮影してみました。

WindowsのEventLogをUbuntuサーバーへ転送して、可視化等の処理を行う手順。
Windowsへnxlogをインストールし、環境に合わせてnxlog.confを編集する。
nxlogのconfig例(json形式で 514/TCPでsyslogとして転送)
参考にした情報:NXLogでWindowsイベントログをsyslog転送してみた
# NXLog Community Edition configuration file
#
# For more information see "C:\Program Files (x86)\nxlog\conf\nxlog.conf"
# or latest version online at https://nxlog.co/docs/nxlog-ce/nxlog-reference-manual.html
# If you experience problems, see https://nxlog.co/community-forum

#### DEFINE ####
define ROOT    C:\Program Files\nxlog
define CERTDIR %ROOT%\cert
define CONFDIR %ROOT%\conf
define LOGDIR  %ROOT%\data
define LOGFILE %LOGDIR%\nxlog.log

Moduledir %ROOT%\modules
CacheDir  %ROOT%\data
Pidfile   %ROOT%\data\nxlog.pid
SpoolDir  %ROOT%\data
LogFile   %LOGFILE%

#### EXTENSION ####
<Extension exec>
    Module xm_exec
</Extension>

<Extension json>
    Module xm_json
</Extension>

<Extension syslog>
    Module xm_syslog
</Extension>

<Extension charconv>
    Module xm_charconv
    AutodetectCharsets shift_jis, utf-8
</Extension>

<Extension fileop>
    Module xm_fileop
    <Schedule>
        Every 1 week
        <Exec>
            file_cycle('%LOGFILE%', 4);
        </Exec>
    </Schedule>
</Extension>

#### INPUT SECTION ####
<Input input_application>
    Module im_msvistalog
    Query <QueryList><Query Id="0"><Select Path="Application">*</Select></Query></QueryList>
    <Exec>
        $Message  = to_json();
        $Hostname = hostname();
    </Exec>
</Input>

<Input input_security>
    Module im_msvistalog
    Query <QueryList><Query Id="0"><Select Path="Security">*</Select></Query></QueryList>
    <Exec>
        $Message  = to_json();
        $Hostname = hostname();
    </Exec>
</Input>

<Input input_system>
    Module im_msvistalog
    Query <QueryList><Query Id="0"><Select Path="System">*</Select></Query></QueryList>
    <Exec>
        $Message  = to_json();
        $Hostname = hostname();
    </Exec>
</Input>


#### PROCESSOR SECTION ####

<Processor buffer_memory>
    Module pm_buffer
    Type Mem
    MaxSize 128000
    WarnLimit 16000
</Processor>


#### OUTPUT SECTION ####

<Output output_syslog>
    Module om_tcp
    Host 192.168.68.73
    Port 514
    <Exec>
        $SourceName          = 'NXLog';
        $SyslogFacility      = 'local0';
        $SyslogSeverityValue = '6';
        to_syslog_ietf();
    </Exec>
</Output>


#### ROUTE SECTION ####

<Route route_application>
    path input_application => buffer_memory => output_syslog
</Route>

<Route route_security>
    path input_security => buffer_memory => output_syslog
</Route>

<Route route_system>
    path input_system => buffer_memory => output_syslog
</Route>
EventIDでフィルタリングする例
define AccountUsage        4740, 4648, 4781, 4733, 1518, 4776, 5376, 5377, \
                           4767, 4728, 4732, 4756, 4704, 4672, 4624

{ 中略 }

#### INPUT SECTION ####

<Input eventlog>
    Module          im_msvistalog
    <QueryXML>
        <QueryList>
            <Query Id='0'>
                <Select Path='Security'>*</Select>
            </Query>
        </QueryList>
    </QueryXML>
    <Exec>
        if ($EventID NOT IN (%AccountUsage%)) drop();
        $Message  = to_json();
        $Hostname = hostname();
    </Exec>
</Input>
Ubuntug側で514/TCPを受信し、WindowsPC(192.168.68.52)から受信した情報に名前(win.log)を付して保存するように設定(rsyslog.conf)
module(load=”imtcp”)
input(type=”imtcp” port=”514″)
:fromhost-ip, isequal, “192.168.68.52” /var/log/win.log
pythonでjson形式のWindows EventLogを一時処理
cat /var/log/syslog | grep -a EventTime の出力を、次のスクリプトでテキスト化
mport sys
import json
import traceback
n=0
for line in sys.stdin:
        n=line.find('{"E') # 文字列 {"Eの位置を得る
        tmp=line[n:]
        m=tmp.find('#') # {"E から # の部分文字列がEventLogの本体
        tmp=tmp[0:m]
        try:
                di = json.loads(tmp)
                n=n+1
                for k, v in di.items():
                        print(f'{k}:{v}')
        except: # エラー情報の表示(デバッグ用)
                t = traceback.format_exc()
                print(t)
                if tmp!='':
                        print('-----------------')
                        print(tmp)
                        print('-----------------')

print('Total lines:',n)
PHPのスクリプト例
<?php
while($line= fgets(STDIN)){
	$p=strpos($line,'{"E');
	$tmp=substr($line,$p);
	$p=strpos($tmp,'#');
	$json=substr($tmp,0,$p);
	#echo "$json\n";
	$lines=json_decode($json);
	foreach ($lines as $key => $var){
		echo "$key,$var\n";
	}
}
?>
イベントIDを指定
<Input eventlog>
# Uncomment im_msvistalog for Windows Vista/2008 and later
Module im_msvistalog
    Query <QueryList>¥
    <Query Id=”0″>¥
            <Select Path=’Security’>*[System[(EventID=’4663′) ]]</Select>¥
            <Select Path=’Security’>*[System[(EventID=’4656′) ]]</Select>¥
            <Select Path=’Security’>*[System[(EventID=’4658′) ]]</Select>¥
        </Query>¥
</QueryList>
# Uncomment im_mseventlog for Windows XP/2000/2003
#   Module im_mseventlog
</Input>STEP-1 pythonスクリプト(detectMETEORa.py)でIPカメラから画像を取得し、動体検知のアルゴリズムを中心とした処理で、流星らしい動画(avi形式)を保存する。
STEP-2 記録した個々の動画をstreamlitスクリプト(play.py)でGUI操作で再生し、目視で流星と判断した動画について、COPYボタンをクリックして、1個のaviファイルから1枚のjpg画像を比較明合成アルゴリズムで生成し、同時にavi形式の動画からh264形式の動画(mp4形式)へ変換して保存する。
STEP-3 jpgファイルとmp4ファイルを、Webブラウザーでインタラクティブに閲覧できるよう、あらかじめ用意したフォルダーへCopyする。
ブラウザーで閲覧するためのphpコード ▶ボタンをクリックして、表示されている画像の動画を再生することが可能です。表示対象の画像を月単位で選択できます。
<?php

$day= new DateTime();

if (isset($_POST['month']) && ($_POST['month']!="")){
        $month=$_POST['month'];
        $f_month=str_replace("-","",$month);
} else {
        $month="";
}

echo "<div>";
echo "<H2>動画を再生するには、各画像左下の再生ボタンをクリックして下さい。</H2>";
echo "<LI>画像上へマウスオーバーするとファイル名を表示します。<BR>";
echo "ファイル名[カメラ名_検知フレーム数_総フレーム数_YYYYMMDD_HHmmSS.mp4]<BR>";
echo "<form method =\"POST\">\n";
echo "<BR><LABEL Date>月を変更するには年月欄の右端をクリックしてください。</LABEL>";
echo "<input type=\"month\" name=\"month\" value=$month>";
echo "<input type =\"submit\"  value =\"表示\">";
echo "</form></dev>";
//echo "$f_month<BR>\n";
$images = glob('meteor/COMP/*jpg');
$n=0;
foreach($images as $v) {
        if (strpos($v,$f_month)) {
                $tmp=explode(".",$v);
                $mp4=$tmp[0].".mp4";
                $mp4=str_replace("COMP","BEST2",$mp4);
                //echo "$mp4<BR>";
                $tmp=explode("/",$mp4);
                $title=$tmp[2];
                $msg="<video controls muted title=$title width='480' height='280' src=$mp4 poster=$v></video>";
                echo $msg;
                if ($n % 2 == 1){
                        echo "<BR>\n";
                }
                $n++;
        }
}
?>